.png)
DIY Beaded Water Tracker in Just Minutes - Stay Hydrated All Day!
- May 24, 2025
- 3 min read

Struggling to keep yourself and your kids hydrated every day? You're not alone.
Keeping track of your daily water intake can feel like a chore. I find it especially difficult for myself and my kids over the summer when schedules are all over the place. But what if tracking your water could be fun and entirely DIY? That’s where beaded water trackers with leather cording come in.
These beautiful reminders are more than just a craft—they’re a tool to keep your health goals on track. Whether you’re a hydration pro or just starting out, this project will have you sipping smarter in no time.
What Is a Water Tracker?
A water tracker is a visual reminder to drink water throughout the day. You can hang them from your water bottle, backpack, beach bag, purse, or gym bag. Each bead represents one glass of water (usually 8-16 oz). As you hydrate, you slide the bead from one side of the cord to the other. By the end of the day, all beads should be moved—indicating you’ve hit your hydration goal!
These are:
Reusable and eco-friendly
Cute and discreet
Perfect for kids, adults, and fitness lovers
Why Make a DIY Water Tracker?
Buying water-tracking apps or high-tech bottles can get expensive—not to mention impersonal. Crafting your own beaded water tracker with leather cord allows you to:
Personalize it with favorite colors
Create meaningful gifts for friends
Engage in a calming, creative activity
Plus, it’s a fun, beginner-friendly DIY craft that anyone can do at home.
Watch the video tutorial:
🔹 Supplies:
Leather cording (3mm thick) – about 24”
5-8 large hole beads – I chose plastic beads, but you could also use glass or metal beads, or even pony beads.
Metal ring binder or carabiner
Krazy Glue – to secure the knot
Scissors
Step-by-Step Instructions: How to Make a Beaded Water Tracker
Step 1: Cut Your Leather Cord
Cut about 24 inches of leather cord. This will give you enough room to create adjustable knots and have space for the beads.
Step 2: Knot the Cord Around a Ring Binder Clip

Fold the cord in half to form a loop at the center of the length of cord. Slide the loop through the middle of the closed ring binder clip.

Push the ends of the cord through the middle of the loop and pull tight to knot it around the ring binder clip.
Step 3: Secure the Beads

Lay the ring binder clip down on a table and separate the two strands of cord. Take the right-hand strand and push it through the center of the bead from the right side to the left.
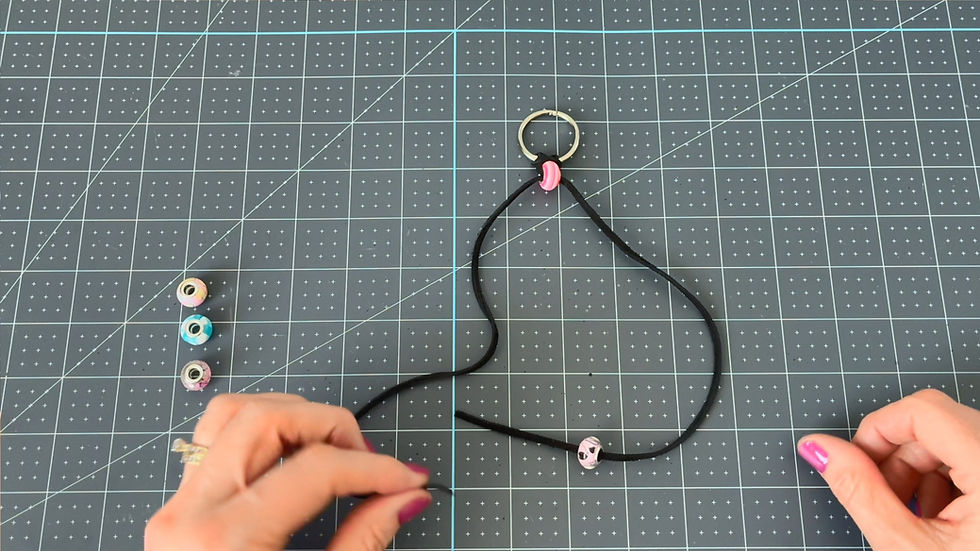
Now push the left-hand strand of cord from the left side of the bead through to the right side.

Even out the ends of cord and gently pull them in opposite directions to draw the bead up to the top.
Repeat for the rest of the beads.
Step 4: Knot the cord
Leaving a space about the size of a bead after the last one, knot the ends of the cord. I like to leave a larger space (about 2 beads worth) so it is very obvious how many beads have been moved.
Step 5: Glue the knot

Apply Krazy Glue or another permanent glue to the knot and let it dry so it’s very secure and won’t open up during use.
Step 6: Trim the ends

Use your scissors to trim the ends of the water tracker. I like to leave about an inch at the bottom because it looks like a tassel.
How to Use Your Water Tracker
Start each morning with all beads on one side of the tracker. Every time you drink a glass of water, slide one bead across to the other side.
By evening, all beads should be moved—voilà! You’ve met your hydration goal.
Common Questions About Beaded Water Trackers
How many beads should I use?
Most people aim for 64 ounces of water a day, so use enough beads to represent your goal. If you mostly drink 8 oz glasses of water, use eight beads. If you primarily drink 16 oz glasses, aim for 4 beads. Adjust according to your goals.
Craft Your Way to Better Health
Making a beaded water tracker with leather cord isn’t just a fun craft—it’s a tangible way to support your health goals every day. Whether you’re sipping mindfully at your desk or staying hydrated on a hike, this DIY tracker keeps you on track.
✅ Ready to Make Your Own?
Grab your beads, cut your cord, and start crafting your own hydration tracker today!
Stay hydrated. Stay creative. Let your wellness journey begin—one bead at a time.
And don't forget to subscribe so you're notified when new projects come out!


Comments